


How ISO, Exposure, and Shutter should be used on a Green Screen.
There are a lot of factors that go into shooting and compositing a great looking green screen. The lighting, the spacing, the camera settings, the compression, and even the lens will all effect the quality of the green screen footage you shoot. Going through most tutorials online, I found none that are thorough about the importance of camera settings to your green screen shoot.
The three main settings I want to focus on in this blog post are the three exposure settings on all cameras, so lighting is still very crucial. The three settings are ISO/Gain, Exposure/F-Stop, and Shutter speed/angle. The ultimate goal for a properly lit green screen shoot is to composite your foreground footage on another background scene. You always want to make sure that your foreground matches your background as much as possible in order to create a believable scene. Using all three of the exposure settings on your camera correctly will help you.
ISO – Keep you ISO or Gain as low as possible to avoid adding grain to your footage.
Grain, or noise, on your footage will always make it harder to key out your background. The more film grain there is in an image the harder it is for your camera to read colors, especially the color green. Really high ISO adds red, green, and blue color grain. That will make it very difficult to key out a green screen when you have green noise bouncing around on your image.
There are other camera settings that cause grain on your video like upping the detail levels and master ped. You should get to know your camera very well and avoid all those settings that add noise to your shot and use the lowest native ISO for your camera. These settings sometimes add more noise than the ISO.
If the final background you will be using has a lot of noise, then I suggest you add noise to your foreground in post-production in order to cleanly key out the green screen. This will help you match your keyed foreground footage with your final background in order to match both sources and create a more realistic scene.
Shutter speed – Use a higher shutter speed to avoid motion blur.
Motion blur in green screen video can be problematic. When your subject is moving in the frame it will have motion blur and blend in with the green screen in the background. If your subject blurs in with your green screen, it will be much tougher to key out the green screen in post-production. This will cause the part of the subject that is blurred to key out with the green screen and look horrible and amateur.
A higher shutter speed like 1/125 – 1/250 is pretty good for most hand motions and small movement from actors. Higher shutter speeds will make the actors fingers or their hair looking crisp. This will help you key out the green between the fingers or the hair. Just remember that shutter speed will effect your other exposure settings and that you will have to adjust your iris or your lighting for a properly exposed scene.
Exposure / F-Stop / Depth of Field – Depth of field will effect the way your foreground matches with your background in your final scene.
The most important thing to remember about all green screen footage is that you want the foreground image that you are capturing on a green screen to look very similar to the final background you will be using in your final scene. You really want to match both the foreground and the background as much as possible for a more professional looking final scene. There are a lot of ways to achieve this but the depth of field is the most important and the most noticeable.
If your background has a shallow depth of field, you want to shoot an image with a shallow depth of field / lower f-stop. If you have an image with a lot of depth of field, you don’t want your actor to have shallow depth of field. This will cause a lot of problems with blending the foreground and background together in a scene and will make your scene look goofy and unrealistic.
Your audience will probably not notice the difference in depth of field like a professional cinematographer would, but they will notice something is wrong with the scene. If your audience thinks there is something wrong with your scene, they will not pay attention to your video and will be trying to figure out what is wrong the whole time.
Based on how much depth of field you want to allow on your green screen footage in order to match it to your background, you should always try to use a higher F-Stop and more depth of field. This will help you in post-production when you key out the green screen. The more depth of field you have in your green screen shot, the more in focus your image will be which will make it easier to key out the green screen in post-production. If the outside edge of your foreground is soft, the more it will blend in with the green from the green screen and it will be harder to key out without keying the edges off.
There are a lot of great editing software and plug-ins out right now that make a horrible looking green screen key out really well. My favorites are The Foundry’s Keylight plug-in for Adobe After Effects and Red Giant’s Primatte Keyer. Like everything though, shooting it right will save you a lot of time and headaches in post-production. The three major exposure setting on your camera play a huge role in how well your green screen will key.
These are just three things out of many to remember when shooting on a green screen. The lighting, spacing, and tripod are just as important as the camera to the overall outcome of your green screen. I hope this has been great information for anyone looking to start shooting on green screens. If you have any questions, feel free to write it in the comments below or contact us.
Thank you for sharing such helpful information.
After several shootings on green screen i started to notice those problems.
I use Keylight for keying and the results are OK. But i was feeling like something is missing and i started to Look at Depth of field Then my 1st thought was to search online and luckily i found you ! I was shooting with CANON 70D and lens SIGMA 18-35 F/1.8 with settings: F/2.5 , – 1/50 Shutter Speed, and 100 ISO . Now after i read your post i changed my settings : F/3.2, – 1/160 Shutter Speed and 500 ISO and my final results are much more better and the keying is easier. I can KEY now in adobe premiere with ULTRA Key plugin and have very good results.
Thank you very much!
How are ya doing, I copied those setting you posted and camera is just too dark to see anything so would you have a solution for that?
All cameras are different. Copying settings between cameras will always give you a different outcome. I wrote the above article in order to teach the theory of how these 3 camera settings affect the outcome of your green screen. Use the knowledge you gain from this article to set the best camera settings for your scene.
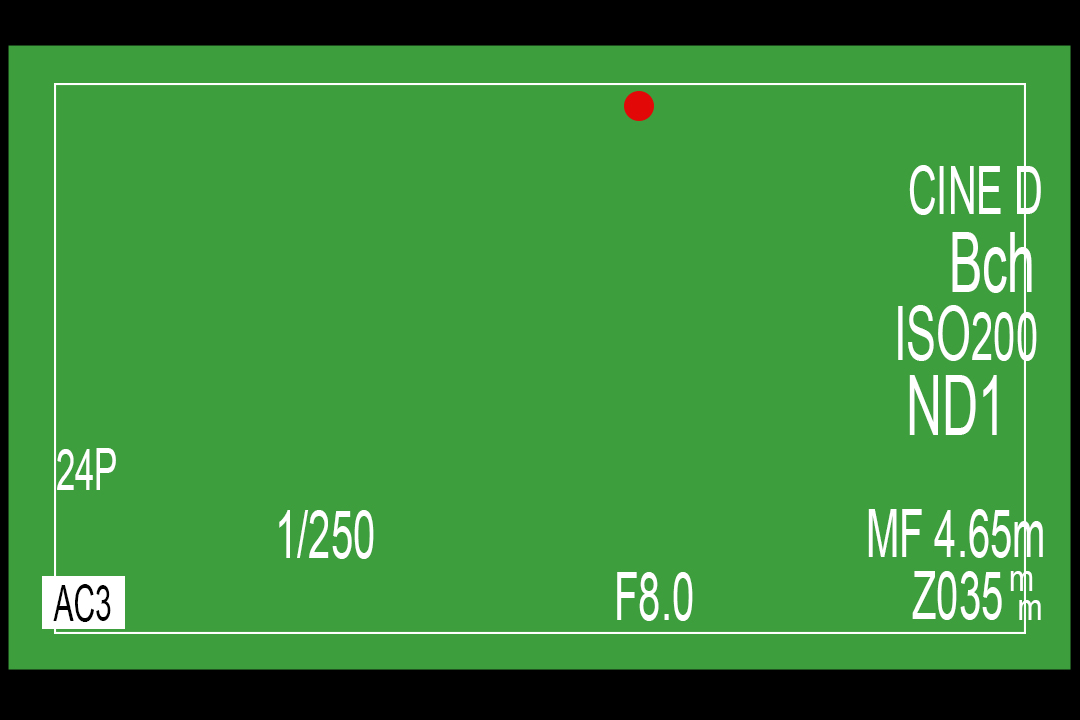
You should not just copy the settings above because that is just a screenshot of my viewfinder, and I am working in a very well lit studio space. 1/250 for shutter speed and an F8.0 exposure is way to high for most situations.
If your settings are pretty normal (ex: 1/100 and F4.0 – F5.6) and your scene is still too dark, it’s because you are not using enough lighting. Either add lighting or start adding ISO. The latter will affect your key out as mentioned above. Just remember that your green screen should be lit evenly and not overexposed or underexposed anywhere. I try to keep mine exposed evenly and between a 45-60 IRE on a waveform.
lol same here its driving me nuts.. These settings are great if I want to take pictures of my lightbulbs in full 4k but the entire greenscreen is black with iso 200 1/250 and F8 .. I’m confused as well. Do you guys have a 2nd sun in your studio or something?
Im new at this i have a nikon d5300 can i usethis camera for green screen
You can use any camera that shoots video. I started shooting photos with a D5200. Although it shoots some pretty good photos, it is not great for video. You can definitely shoot a green screen, but you will struggle because of its limitations. It also only shoots 30 minutes at a time before it stops recording. Cameras built for video will always do a better job. You should do a test and decide whether you want to buy or rent another camera, or if the extra effort in post-production is worth it for you.
Nice information. But can you tell me what about the camera sharpness and saturation?
Thank you.
Sharpness and saturation will always effect your green screen. I wrote this article as a basic introduction of how your 3 main exposure settings impact the outcome of your green screen.
I will keep this short, but sharpness and saturation settings in a green screen shoot should be adjusted to what will best match the background you will use. Sharpness will affect your key in a similar way that DOF will, but it won’t change the key that much. More sharpness will not actually get you a better key in post. Saturation will change your colors, to put it simply. This will affect your key if there is too much saturation. The best thing to do is to keep your saturation and sharpness settings in the middle, or where you usually have those settings when you are shooting. Shoot your green screen, key it out, and then add your any saturation or sharpness after your key.
Just remember that different cameras, lenses, lights and green screens will give you a different outcome and you should always test your green screen before your shoot. For example: Many lenses are slightly softer when your exposure is lower than F4, sharpest between F4 and F8 or F10, and then start getting softer again at higher exposures above F8. Not all lenses are like that. Always test your equipment and your green screen key before your shoot.
Very helpful. I will go back and do this over again. Particularly the ISO setting and the depth of field. My DoF was too shallow.
I’m glad I could help. DOF is tough because sometimes your background will require less DOF. If you shoot your green screen with high DOF, your foreground subject will look out of place in a background that has small DOF. I always try to shoot my own backgrounds for green screen projects. That way I can match my settings and camera setup between the foreground and background. I try to match the spacing between the camera and subject, exposure and color temperature. All other settings can be adjusted to match in post-production.
Thanks for the blog. Yes there seems to be little info online regarding camera settings and green screens.
Ben
I’m thinking about creating another article that goes into more detail on shooting green screens. Let me know if there is anything you me to focus on.